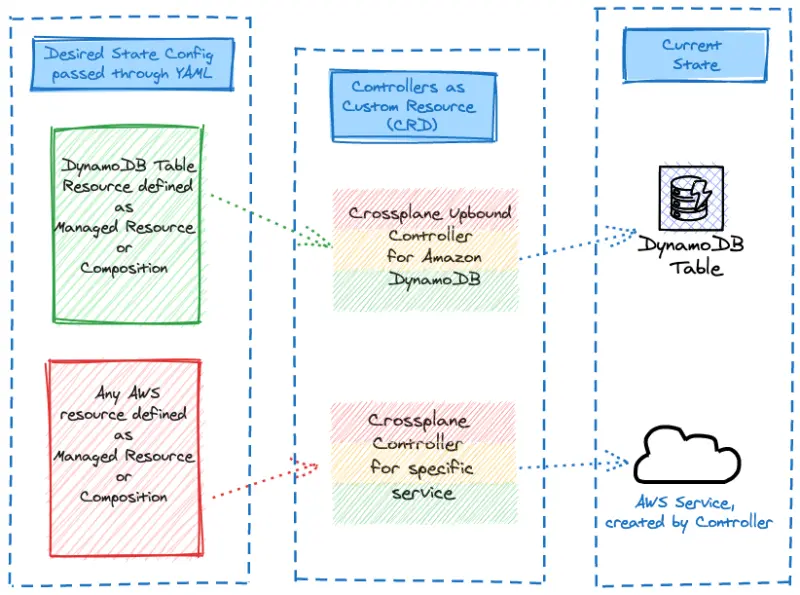
Managed Resources
By default the Carts component in the sample application uses a DynamoDB local instance running as a pod in the EKS cluster called carts-dynamodb. In this section of the lab, we'll provision an Amazon DynamoDB cloud based table for our application using Crossplane managed resources and point the Carts deployment to use the newly provisioned DynamoDB table instead of the local copy.
The AWS Java SDK in the Carts component is able to use IAM Roles to interact with AWS services which means that we do not need to pass credentials, thus reducing the attack surface. In the EKS context, IRSA allows us to define per pod IAM Roles for applications to consume. To leverage IRSA, we first need to:
- Create a Kubernetes Service Account in the Carts namespace
- Create an IAM Policy with necessary DynamoDB permissions
- Create an IAM Role in AWS with the above permissions
- Map the Service Account to use the IAM role using Annotations in the Service Account definition.
Fortunately, we have a handy one-liner to help with this process. Run the below:
2023-10-30 12:45:17 [i] 1 iamserviceaccount (carts/carts-crossplane) was included (based on the include/exclude rules)
2023-10-30 12:45:17 [!] serviceaccounts that exist in Kubernetes will be excluded, use --override-existing-serviceaccounts to override
2023-10-30 12:45:17 [i] 1 task: { 2 sequential sub-tasks: {create IAM role for serviceaccount "carts/carts-crossplan",
create serviceaccount "carts/carts-crossplane",
} }2023-10-30 12:45:17 [i] building iamserviceaccount stack "eksctl-eks-workshop-addon-iamserviceaccount-carts-carts-crossplane"
2023-10-30 12:45:18 [i] deploying stack "eksctl-eks-workshop-addon-iamserviceaccount-carts-carts-crossplane"
2023-10-30 12:45:18 [i] waiting for CloudFormation stack "eksctl-eks-workshop-addon-iamserviceaccount-carts-carts-crossplane"
eksctl provisions a CloudFormation stack to help manage these resources which can be seen in the output above.
To learn more about how IRSA works, go here.
Now, let's explore how we'll create the DynamoDB table via a Crossplane managed resource manifest
apiVersion: dynamodb.aws.upbound.io/v1beta1
kind: Table
metadata:
  name: "${EKS_CLUSTER_NAME}-carts-crossplane"
  labels:
    testing.upbound.io/example-name: dynamodb
  annotations:
    crossplane.io/external-name: "${EKS_CLUSTER_NAME}-carts-crossplane"
spec:
  forProvider:
    attribute:
      - name: id
        type: S
      - name: customerId
        type: S
    hashKey: id
    billingMode: PAY_PER_REQUEST
    globalSecondaryIndex:
      - hashKey: customerId
        name: idx_global_customerId
        projectionType: ALL
    region: ""
    tags:
      namespace: carts
  providerConfigRef:
    name: aws-provider-config
Finally, we can create the configuration for the DynamoDB itself with a dynamodb.aws.upbound.io resource.
table.dynamodb.aws.upbound.io/eks-workshop-carts-crossplane created
It takes some time to provision the AWS managed services, in the case of DynamoDB up to 2 minutes. Crossplane will report the status of the reconciliation in the status field of the Kubernetes custom resources.
NAME READY SYNCED EXTERNAL-NAME AGE
eks-workshop-carts-crossplane True True eks-workshop-carts-crossplane 6s
When new resources are created or updated, application configurations also need to be updated to use these new resources. Update the application to use the DynamoDB endpoint:
namespace/carts unchanged
serviceaccount/carts unchanged
configmap/carts unchanged
configmap/carts-crossplane created
service/carts unchanged
service/carts-dynamodb unchanged
deployment.apps/carts configured
deployment.apps/carts-dynamodb unchanged
deployment "carts" successfully rolled out
Now, how do we know that the application is working with the new DynamoDB table?
An NLB has been created to expose the sample application for testing, allowing us to directly interact with the application through the browser:
k8s-ui-uinlb-a9797f0f61.elb.us-west-2.amazonaws.com
Please note that the actual endpoint will be different when you run this command as a new Network Load Balancer endpoint will be provisioned.
To wait until the load balancer has finished provisioning you can run this command:
Once the load balancer is provisioned you can access it by pasting the URL in your web browser. You will see the UI from the web store displayed and will be able to navigate around the site as a user.

To verify that the Carts module is in fact using the DynamoDB table we just provisioned, try adding a few items to the cart.

And to check if items are in the DynamoDB table as well, run
PRICE 795
ITEMID 510a0d7e-8e83-4193-b483-e27e09ddc34d
PRICE 385
ITEMID 6d62d909-f957-430e-8689-b5129c0bb75e
PRICE 50
ITEMID a0a4f044-b040-410d-8ead-4de0446aec7e
Congratulations! You've successfully created AWS Resources without leaving the confines of the Kubernetes API!